As organizations invest more in the API economy, there’s a big realization on how difficult it can be to ensure success in their API programs. With more devices getting added to the multi-platform ecosystem, and consumers of varying skill level starting to adopt APIs, there is a definite need for policies and management to ensure program find success. There are numerous platforms, both cloud based and on-premise, that allow organizations to abstract their management layer. Apigee, from Google, has emerged as one of the leading players in the API management space, commanding an impressive suite of features, and a large and loyal customer base. With the growing demand for integrating the API design and documentation process into Apigee, SwaggerHub is proud to introduce a direct integration with Apigee Edge, a platform for managing API proxies.
Seamless Integration to Apigee Edge
SwaggerHub has always aimed to provide the best, collaborative API design and documentation solution that fits neatly into your software lifecycle. API design and documentation have direct implications on the development and consumption of your APIs. As a result, it’s important to invest in giving your APIs a first-class treatment, right from the initial design phase. But we recognize the need for customers to also manage their APIs in a solution that is built for controlling and managing the consumption of APIs, along with rate limiting, monitoring, and analytics capabilities. The direct integration with Apigee furthers our commitment towards ensuring SwaggerHub can integrate flexibly with as many software lifecycle tools as possible. What this means for customers is that their API design and documentation can be easily exported to Apigee Edge as proxies, to eventually deploy and manage them in different dev and production environments. SwaggerHub is the most powerful platform for teams that are using the OpenAPI (Swagger) specification to design and document their RESTful APIs. And with this newest integration, SwaggerHub can now act as the source of truth for your team’s API design and documentation, and keeps them in sync with Apigee’s robust API management solution. While the concept is simple, it has powerful implications to an organization’s API development lifecycle. The integration can seamlessly bridge the gap between development and consumption of the API, making sure customers get the best of both worlds on SwaggerHub.
How it Works
The integration is extremely simple to use. All you need to get started is:
- A SwaggerHub Team or Enterprise account
- An Apigee Edge account
You can create a new API, or go to an existing API on SwaggerHub. The integrations can be accessed from the top right corner of the SwaggerHub Editor, where you can select the Apigee Edge Integration from the drop down. 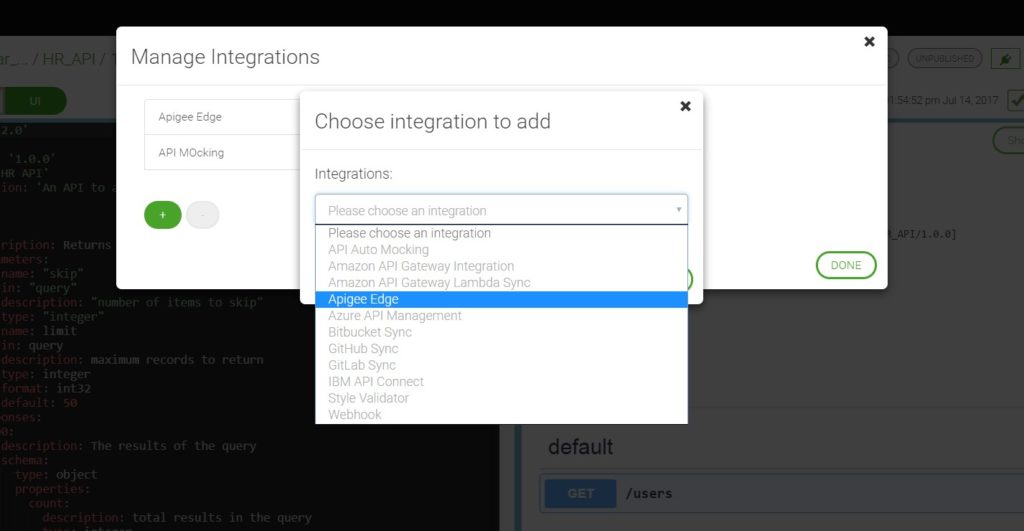 You can then add your Apigee authorization, and configure a few quick fields to get the integration set up. The fields include:
- Name: A display name for this integration, for example, Apigee.
- Apigee Edge Server: The URL used to access the Edge management API. If you use Apigee Edge Cloud (the SaaS version), leave the default value https://api.enterprise.apigee.com/v1, otherwise, replace it with the corresponding URL for your Edge instance.
- Apigee email and Apigee account password: The email and password you use to log in to Apigee Edge.
- Organization: The organization within your Edge account where the API proxy will be created. You can see your organization names in your username menu in Apigee Edge.
- API Name: A unique name for the created API proxy. Valid characters are letters, numbers, dash (-), and underscore (_). You can also specify the name of an existing API proxy - in this case, the integration will create a new revision of this proxy. The proxy name will also be saved in the x-apigee-id key in your API definition.
- Target URL – The endpoint to which Apigee Edge will route the requests. For example, http://api.example.com/reports/v2 or https://myapi.com. If your API definition specifies the host, basePath and scheme, this is scheme:host/basePath.
And that’s it! The integration, once enabled, can be triggered with every save. SwaggerHub will create or update the specified API proxy, and from now on will create a new revision of the proxy every time you save your API definition. The proxy serves as a management layer in front of your existing backend API and allows you to attach various policies to manage the traffic, add authentication, transform the payload, and so on. Read the full documentation for the SwaggerHub Apigee Edge integration here.
Try the Apigee Integration Today!
We’re excited to introduce the Apigee integration to our existing line of integrations to various external software tooling. If you’re an existing SwaggerHub user, you can log in now to try them out for yourself. If you’re currently using Apigee for API management, but haven’t explored SwaggerHub for API design and documentation, you can try SwaggerHub for free for 14-days. Have comments/questions/feedback? Let us know in the comments below.